Get Familiar with TallyPrime Features
Let’s take a quick look at the TallyPrime features & patterns like Basis of Values and Go To that will help you to work efficiently with minimal learning. Understand these features & patterns so that you can try any feature in the product.
Once you install TallyPrime, activate the license, create a Company, and then you can start using TallyPrime features and record your business transactions. To make use of the flexibility of TallyPrime and enhance your productivity, take a quick look at the interaction experiences and understand the patterns.
Home screen that you see when you open TallyPrime includes the top menu, Go To/Switch To buttons, Gateway of Tally, and buttons on the right hand side. These options aid in finding and opening different ledgers, vouchers, and reports that help you accomplish your business tasks. There are multiple ways in which you can reach the desired destination. You can choose the ways you prefer.
Navigation across TallyPrime widely uses Enter key and Escape key. While there are different ways in which you can reach a destination, pressing Enter will take you to the next level of information, and Escape will take you back to the previous level, until you reach Gateway of Tally. In addition to that, the same Escape key will let you close TallyPrime, with a confirmation. Similarly, you can use different key combinations to achieve what you want. In fact, you can navigate and use TallyPrime features completely using a keyboard.
Data entry for recording different types of transactions are made similar to enhance learning, and retention of knowledge. Master creation is made simple by using similar actions wherever possible, and multiple ways to reach the create options.
Reports are presented in a hierarchical manner for easy analysis. While TallyPrime provides a large number of reports, reading and understanding the reports are simplified with similar interactions. When you open a report, you will get the summary data for the most relevant report period. From there you can change the report period, presentation format, and so on, up to the value that forms the basis of the report. Consistent interactions make it easier for you to navigate, and memorise the steps.
Sharing data in printed formats, or in electronic file formats through e-mail or export is one of the useful TallyPrime features available by default. You can share individual vouchers, or reports, as well as in bulk, with just a few key presses. Sending payslips to your employees, or reminder letters to your parties are equally simple.
Easy setup enables you to start using TallyPrime for recording your business transactions in a couple of minutes. While there are many features available out-of-the-box, you can decide to start with the minimal set, right away. You can start using the other TallyPrime features as and when you come across a business need. You can explore and use many features as your business grows and diversifies. This facility helps you to start simple, and gradually add more features as needed. You can switch many features on and off as you want or require. Alternatively, you can start using all the TallyPrime features in the beginning, if needed.
Set up for personal preferences is another flexibility that you get to in order to use the application comfortably. Such configurations can be done independently for every installation of TallyPrime using F12 Configurations. Different types of ledgers and vouchers can have different configurations. Similarly, you can set your preferences for reports, printing, and other data communication options.
Home Screen
When you open TallyPrime, you can see a home screen with different items – a top menu bar with pull down options, the details of the Companies that are open, the Gateway of Tally menu, and a button bar on the right-hand side of the screen.
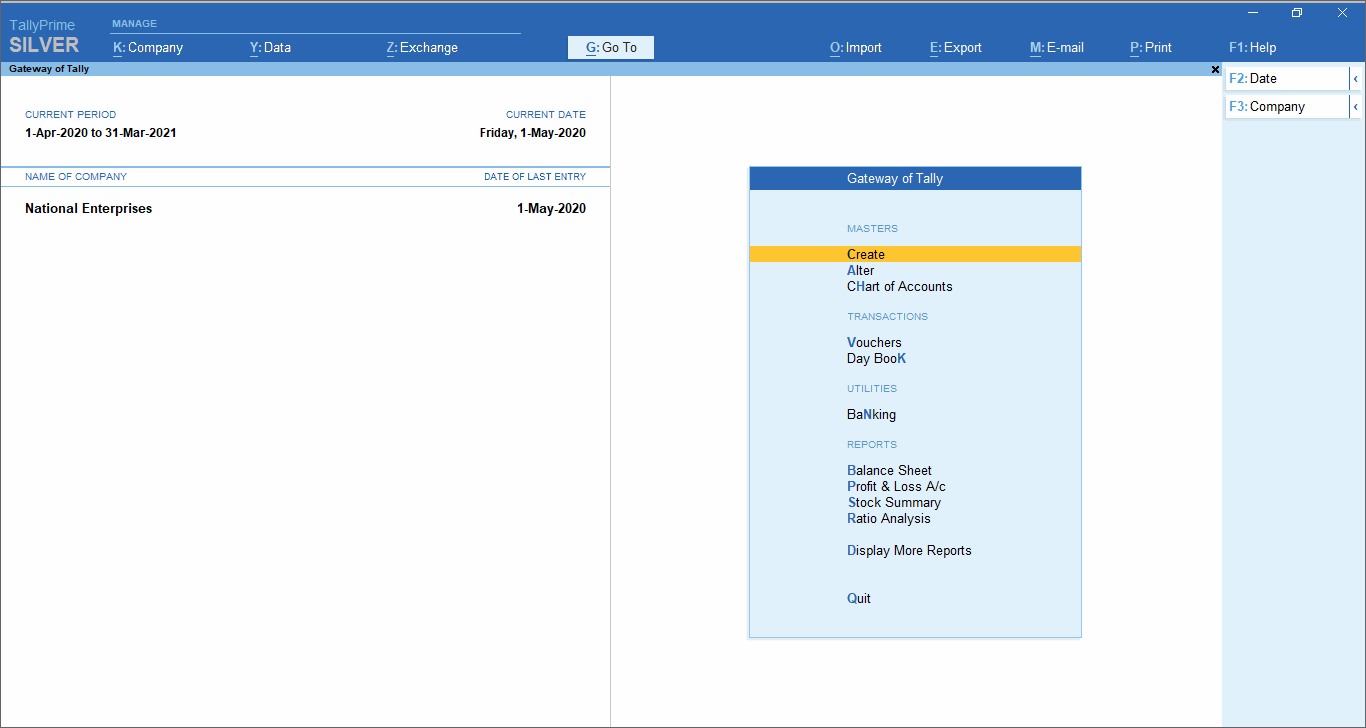
Top Menu has options to manage your Companies, TallyPrime application, users in your Companies, and your data storage & sharing. This menu and child items in the menu are also accessible from any screen in TallyPrime. Help menu has options to launch TallyHelp and to upgrade your application to a newer release of the product. Availability of a newer release is indicated with a red dot notification on the menu name Help. Additionally, other options under the Help menu include What’s New, TallyShop for buying add-ons, Troubleshooting to repair your application and data in case there are issues, Settings to configure your application, TDL & Add-On to manage your extensions/customisations, and an About report that shows the details of your TallyPrime installation and its environment.
Shortcuts form an easy way to use TallyPrime features. Shortcut/hotkey to access each option in the top menu is shown in bold capital letter that is underlined, or F1. When the shortcut has a single underline, you can just press Alt and the letter key to access the corresponding option. Shortcuts without underline work with the single key press. When you access any of the menu items, a list of options grouped under the menu item opens, and you can access each using the corresponding shortcut or mouse. For example, Alt+K > C will open Company Creation screen.
Tip: You can use just the keyboard to interact with TallyPrime and use TallyPrime features if you prefer so. You can also comfortably use mouse. This is possible on all screens in TallyPrime.
Go To option on the top menu helps you to quickly access any report or TallyPrime features that you want to use. Any screen that you access using Go To will open on top of the current screen, and closing the screen will take you back to the screen that was open earlier. You can use Alt+G to access Go To.
The option Switch To is placed with Go To as a toggle to help you move from the current screen to any other screen. You can use Ctrl+G to access Switch To.
More about Go To and Switch To are given below.
Tip: Use Alt key to access the shortcuts with a single underline. To access the shortcuts with double underline, use the Ctrl key.
Company details are shown below the top menu, on the left side of the screen. The details include the CURRENT PERIOD and CURRENT DATE, the names of the Companies that are open, and the last date of transactions in each Company. Further, in case your Company is connected and is accessible online, that is also shown here with (c).
Gateway of Tally groups the different TallyPrime features, based on the nature of activities. Options on the main screen of TallyPrime include Masters, Transactions, Utilities, a few Accounting and Financial reports, and an option to view more reports. When you select any of these options, a screen opens that lets you create or alter a master or transaction, view a report, or list other options. Notice that every option in the Gateway of Tally has one bold capital letter, the shortcut to access the option. You can just press the letter key to access the corresponding item. For example, K is to open Day Book, and B for Balance Sheet.
Right Button Bar on the home screen of TallyPrime has two buttons F2: Date and F3: Company. On pressing Alt key the options change to F2: Period and F3: Select Company. Pressing Ctrl+F3 keys show the option Shut Company. Alternatively, you can click the expand option, < next to each button to view the corresponding options. Options on the right button bar change based on the screen that is open as per the actions relevant to the screen or the transaction you are working on. However, the shortcuts associated with different options are consistent across masters, vouchers and reports. For example, F2 is always for date, Alt+F2 is for period, F10 in master screens is for Other Masters & voucher screens is for Other Vouchers, and Ctrl+B in reports is for Basis of Values.
More about Right Button Bar is given below.
Let us explore a little more about the buttons on the right button bar.
- F2, F3, F12 options – remain constant on all screens, transactions, masters and reports.
- F4 to F10 – each one has a preset but different action in transactions, masters, and reports.
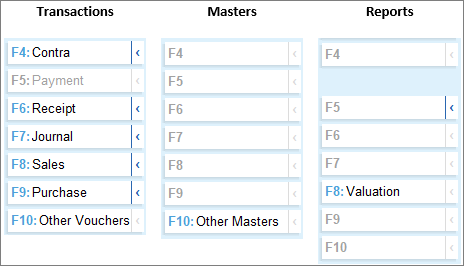
- Ctrl+B/H/J – has present actions only in reports.
- Ctrl+F/H/I – has preset actions only in vouchers.
In a similar manner, there are predefined list of buttons for different actions. Check different buttons when you are on different screens to know these options better.
Note: In this topic, different options are used in procedures to open different transactions and reports, so that you get familiar with these.
Company
Company in TallyPrime is equivalent to the books of accounts that you maintain manually, in the absence of an accounting application. You can specify the details of your business like the name of the company, the business name that needs to be printed in documents, the state and country where your business operates, the financial year followed, the date from when the books are maintained, base currency of your business, and so on.
To create a Company in TallyPrime,
- Press Alt+K > Create.
Alternatively, at the Gateway of Tally, press F3 > Create Company.
The Company Creation screen appears. - Enter the Company Name.
Notice that a few fields are auto-filled. You can change any of these values as needed. - Enter the details or verify the auto-filled details.
You can change these values later as needed. However, be careful about choosing the Financial year beginning from and Books beginning from dates.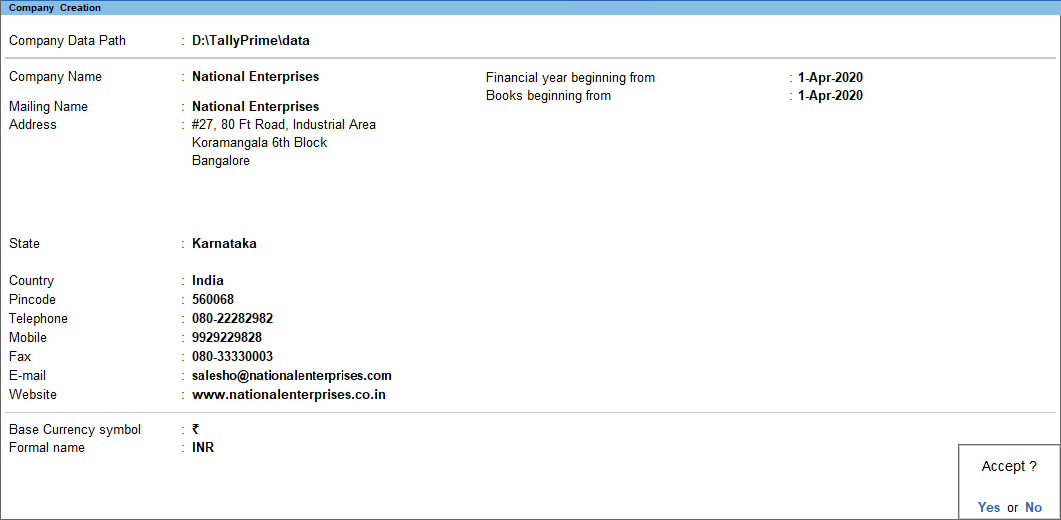
- Press Ctrl+A to create the Company.
Alternatively, you can press Y when the Accept message appears, on navigating to the end of the screen. - Enable the required features for your Company.
You can enable or disable any of these features later. - Press Ctrl+A to save the selected features.
You can press Esc thrice to close the features screen, if you do not need to change any.
Tip: Use Ctrl+A to save the details entered and Esc to cancel the changes and move back to the previous screen. This works in a similar manner on all data entry screens in TallyPrime.
Your Company is ready for use.
Tip: After creating a Company, you can use F11 to enable or disable any feature when needed. You may make a list of all the features that you want in your Company and enable these features at one go. Alternatively, start simple and keep enabling more features as needed.
In case you want to specify additional details for your Company, press F12 on the Company Creation screen.
Tip: Use F12 (Configure) in TallyPrime screens to alter the on-screen options/configurations as per your preference. This is possible on all screens in TallyPrime where there are additional options available.
F12 Configure options
- Provide Contact Details – To show the options to capture the company contact details.
- Use TallyVault Password to encrypt Company Data – To show the option to set TallyVault Password.
- Use User Access Control – To show the option to enable user-based access to the Company.
- Provide Additional Base Currency details – To show options to specify additional details of the Base Currency.
Refer to Working with Company section for further details.
Tip: Once you set the configurations using F12, the options will apply to all the subsequent master creation and transaction recording, until you change the configuration. Such configurations are referred to as persistent configurations.
Use Ctrl+I (More Details) to do such configurations for selective masters or transactions. Every time you need to add such details, you need to use More Details. Such configurations are referred to as non-persistent configurations.
For example, consider a situation where most of your sales happen without orders. But once in a while you want to provide order details during Sales voucher entry. Here you can use Ctrl+I. If you enable Order Details in F12, all subsequent sales transactions will show the Order Details screen. To avoid this, you can use I: More Details.
Business Data Recording
You can start using all the TallyPrime features and record your business transactions after you create a Company. Any master – ledgers and Stock Items that you need can be created as and when needed. That too with the available details!
TallyPrime does not insist on any specific order for data entry. So, you can do data entry as per your needs and convenience. Just for the ease of reading and trying, let us start with Masters, and then move to transactions and reports.
Masters: TallyPrime classifies masters as Accounting Masters, Inventory Masters, Statutory Masters, and Statutory Details. Accounting Masters include Ledger, Group, Cost Category, Cost Centre, Currency, and Voucher Type. Inventory Masters include Stock Item, Stock Group, Stock Category, Unit, Godown, Price Lists for Stock Group and Stock Category, and Price Levels. Statutory Masters and Details vary depending on the taxation that you have enabled.
Transactions: You can use TallyPrime for different types of transactions – Payment, Receipts, Sales, Purchase, Orders, Material In, Material Out, and so on. To address all such needs TallyPrime provides 24 default Voucher Types to ease voucher creation. You need not follow the double entry mode or know accounting principles to use these Voucher Types. You can just enter the relevant transaction details for the one you are recording. TallyPrime will ensure consistency of updates as per accounting standards. On the other hand, if you are an accountant and prefer double entry, then you can record all these transactions in double entry mode using the Journal Voucher.
Note: When you install TallyPrime for the first time, there are 20 Voucher Types. On enabling more F11 features, you will see 24 Voucher Types.
TallyPrime also provides the flexibility to record optional vouchers for the cases that you are not sure of now but want to make provisions for the same. When you are sure that certain expenses will happen on a future date, you can create post-dated vouchers, and account for such transactions. All these will help you do business analysis considering the anticipated transactions.
Apart from the plethora of Voucher Types, you can also enter vouchers in different modes:
- Voucher Mode for double entry with Dr and Cr. This is useful for accountants who want to continue using the double entry mode, as they had been doing in manual books of accounts.
- Item Invoice Mode for trading invoices, and Accounting Invoice Mode for service vouchers. In case you are not well versed with accounting, you can use these modes for easy and error-free data entry.
Create Ledgers & Groups
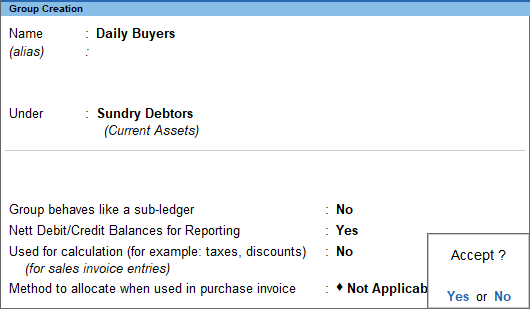
Ledgers in TallyPrime are similar to the ledgers that you use in the books of accounts. There are two default ledgers – Cash and Profit & Loss A/c. The list of ledgers in your business will be to account for different types of purposes like suppliers/creditors, buyers/debtors (party), sales (Sales Accounts), purchase (Purchase Accounts), bank (Bank Accounts), and so on. You can create your ledgers under the relevant group based on the nature of the ledger. For example, you can create a supplier ledger ABC traders under the Group Sundry Creditor. This will ensure that ABC traders are treated as Sundry Creditors, and will appear for selection in the relevant field when recording transactions.
Groups are available in TallyPrime by default to classify the ledgers. There are 28 default Groups, like Bank Accounts, Indirect Expenses, and so on. These Groups address most of your business needs. However, you can create additional Groups under these default Groups as per your needs. For example, Export Sales under Sales Accounts to classify the ledgers used for exports, Duty Paid Purchases under Purchase Accounts for imports, and so on.
Create Ledgers
You can use multiple ways to create Ledgers in TallyPrime. Since TallyPrime does not insist on any master creation before you start recording your transaction, you can create the required ledgers while recording the transactions. For example, say you are recording your first payment transaction. If you have not created the relevant party ledger while entering the payment voucher, then you can create it on the fly. Otherwise, you can create the party ledger first and then record the payment to the party. Another way to create a ledger is from the Chart of Accounts.
In case you have many ledgers to create, you can use the multi ledger creation option or import using XML file. You can also synchronise the ledgers created at your head office or warehouse.
Tip: You can start creating ledgers with what you know. Rest of the details can be updated as and when you get those. If any necessary information is missing in the masters or transactions, TallyPrime will bring it under the exception frame and lets you update. This helps to ensure completeness before you file your returns.
- Go to Gateway of Tally > Create > Ledger or Alt+G (Go To) > Create Master > Ledger.
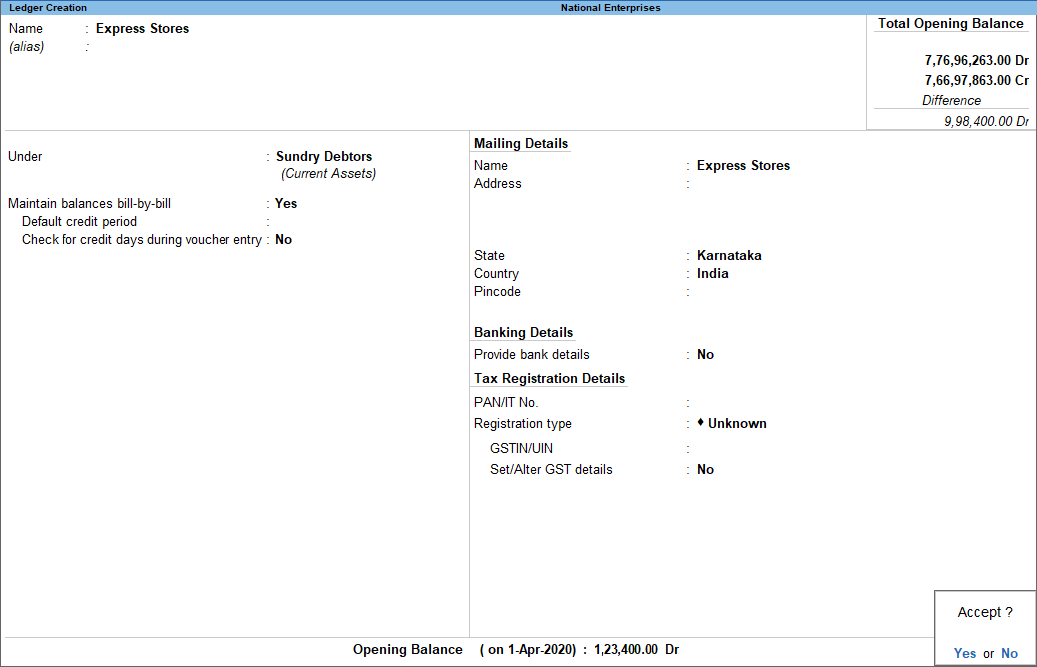
- Enter the ledger name.
- Select the Group under which you want to create the Ledger.
- Update the remaining details as needed.
- Press Ctrl+A to create the ledger.
Tip: On any screen you can use Enter to navigate forward, and Backspace to navigate backward.
You can use the ledger in any transaction as needed. Similarly, you can create other ledgers. If you are into service business, then you can create ledgers for the services you offer.
In case you want to enable additional configurations for your ledger, as mentioned earlier, press F12 on the Ledger Creation screen.
Tip: When you use Alt+C to create any master when you are in a master selection field, you can see (Secondary) in the screen name. This helps you identify that you have opened the master creation screen from another master or transaction.
Create Groups
You can use multiple ways to create Groups in TallyPrime. You can create a Group on the fly when you are creating a ledger. Otherwise, you can create a Group first, and then record the transaction for the party. As in the case of ledgers, you can import or synchronise the list of Groups, if needed.
- Go to Gateway of Tally > Create > Group or Alt+G (Go To) > Create Master > Group.
- Enter the name and select the Group under which you want to create this group.
- Update the remaining details as needed.
- Press Ctrl+A to create the Group.
You can use the Group for any ledger as needed. Similarly, you can create other Groups.
Tip: In TallyPrime, you can accomplish a specific task in different ways, and at different points in time. There are different options to create masters, and these options have similarities. Specific details for each master are captured in the creation screens.
In case you want to enable additional configurations for your Group, as mentioned earlier, press F12 on the Group Creation screen.
Create Stock Items, Stock Groups, and Stock Categories
Stock Items in TallyPrime is to maintain the details of the items that you handle in your business. The list of items can include all the items you trade and the consumables you use in the process of running your business. Further, you can group the items under Stock Groups and Stock Categories, if needed, for ease of management and analysis. For example, you can create the item pens under the group Ball Pens and Markers, as the case may be. You may be selling pens from different vendors like Faber Castle, Camel, and so on. Here, you can create parallel categories by the name of the brands and use it for analysis of sales by brand.
Stock Group available in TallyPrime by default is Primary. In case you do not need to have multiple groups for analysis, you can just manage with the Primary group. However, you can create additional Stock Groups under Primary as per your needs.
Stock Category available in TallyPrime by default is Primary. In case you do not need to have multiple categories for analysis, you can just manage with Primary. However, you can create additional Stock Categories under Primary as per your needs.
Create Stock Items
You can use multiple ways to create Stock Items in TallyPrime. Since TallyPrime does not insist on any master creation before you start recording your transaction, you can create the required Stock Items when recording the transactions. For example, say you are recording your first Sales transaction. If you have not created the relevant items when entering the Sales voucher, then you can create it on the fly. Otherwise, you can create the Stock Item first and then record sales.
In case you have many items to create you can use the multi item creation option or import using XML file. You can also synchronise the items created at your head office or warehouse.
- Go to Gateway of Tally > Create > Stock Item or press Alt+G (Go To) > Create Master > Stock Item.
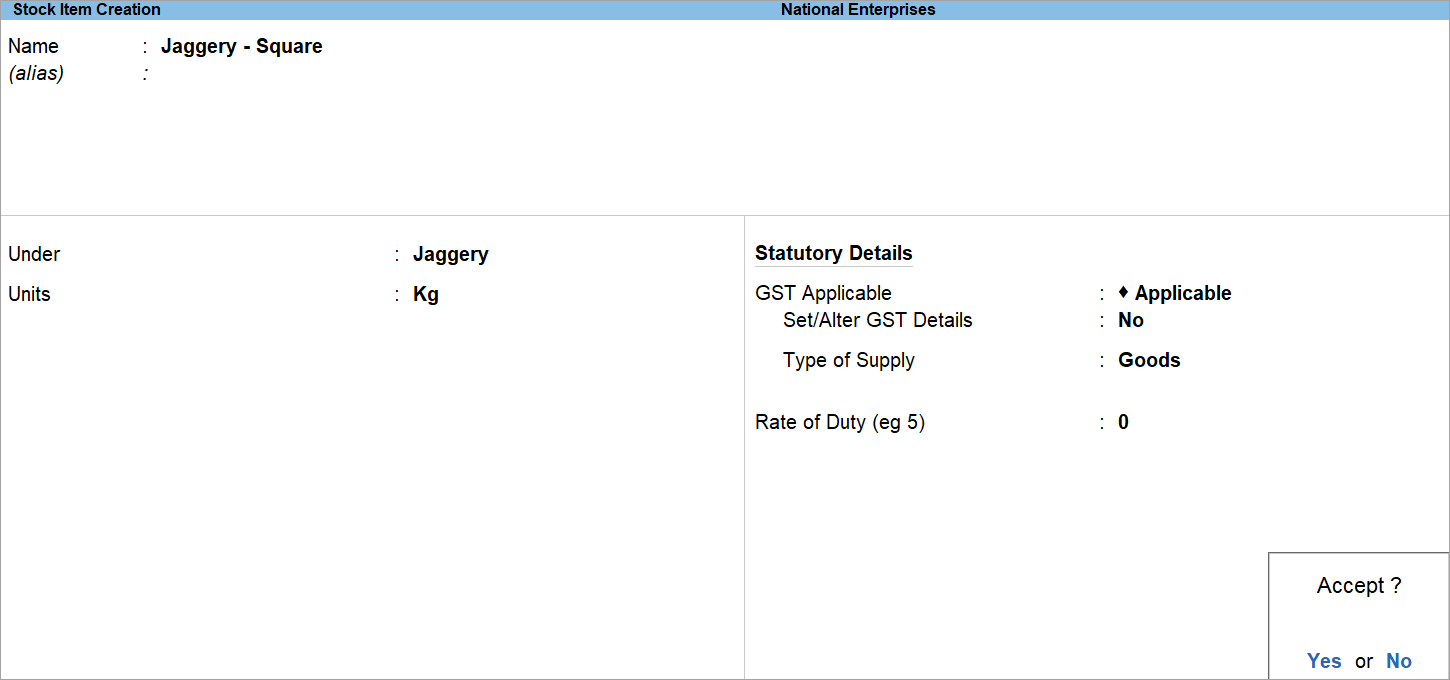
- Enter the name and Stock Group under which the item has to be created.
- Specify the unit for the item.
- Update the remaining details as needed.
- Press Ctrl+A to create the Stock Item.
You can use the Stock Item for any transaction as needed. Similarly, you can create other Stock items.
Tip: In a data entry screen, to select a value from a list you can start typing the name. The list gets filtered and the items having the name starting with the letters you entered will appear in blue. If the letters you entered are present in the item but not in the beginning, then only the letters you entered will appear in blue.
When you are in a list to select a master, you get an option to create a new item in the list. Alternatively, press Alt+C. The master creation (Secondary) screen will appear.
When you are in a master screen, press F10 to switch to Other Masters.
In case you want to enable additional configurations for your Stock Items, as mentioned earlier, press F12 on the Stock Item Creation screen.
Create Stock Groups
You can use multiple ways to create Stock Groups in TallyPrime. You can create a Stock Group on the fly when you are creating a Stock Item. Otherwise, you can create the Stock Group first and then create the Stock Items. As in the case of Stock Items, you can import or synchronise the list of Stock Groups, if needed.
- Go to Gateway of Tally > Create > Stock Group or Alt+G (Go To) > Create Master > Stock Group anytime.
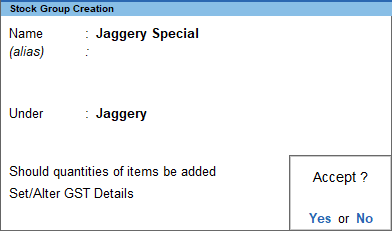
- Enter the name and Stock Group under which the new Stock Group has to be created.
- Update the remaining details as needed.
- Press Ctrl+A to create the Stock Group.
You can use the Stock Group for any item as needed. In a similar way you can create other Stock Groups.
In case you want to enable additional configurations for your Stock Groups, as mentioned earlier, press F12 on the Stock Group Creation screen.
Create Stock Categories
You can use multiple ways to create Stock Category in TallyPrime. Otherwise, you can create the Stock Category first and then create the Stock Items. As in the case of Stock Items, you can import or synchronise the list of Stock Categories, if needed.
- Go to Gateway of Tally > Create > Stock Category or Alt+G (Go To) > Create Master > Stock Category.
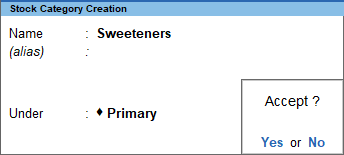
- Enter the name and Stock Category under which the new Stock Group has to be created.
- Update the remaining details as needed.
- Press Ctrl+A to create the Stock Group.
You can use the Stock Category for any item as needed. Similarly, you can create other Stock Categories.
In case you want to enable additional configurations for your Stock Categories, as mentioned earlier, press F12 on the Stock Category Creation screen.
Create Units
For every item in TallyPrime you can associate one or more units of measurement. There are no default Units available. You can create a Simple Unit or Compound Unit as needed for each item. You can also use alternate units, if needed.
Unit Creation can be done in multiple ways in TallyPrime. If you have not created the relevant unit before creating a Stock Item, then you can create it on the fly. Otherwise, you can create the Unit first, and then create the Stock Item. You can also synchronise the Units created at your head office or warehouse.
Create Simple Units
- Go to Gateway of Tally > Create > Unit or use Alt+G (Go To) > Create Master > Unit.
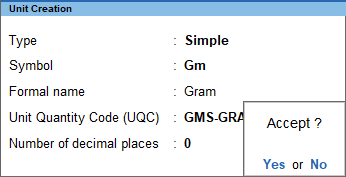
- Enter the Symbol and Formal name.
- Update the remaining details as needed.
- Press Ctrl+A to create the Unit.
You can use the Unit for any item as needed. In a similar way you can create other Simple Units.
In case you want to enable additional configurations for your Units, as mentioned earlier, press F12 on the Unit Creation screen.
Create Compound Units
- Go to Gateway of Tally > Create > Unit or use Alt+G (Go To) > Create Master > Unit.
- Press Backspace and select Compound if the Type selected is Simple.
- Enter the Compound Unit as the First unit. For example, Kg.
- Enter the Conversion factor. For example, 1000.
- Enter the Second unit. For example, Gm.
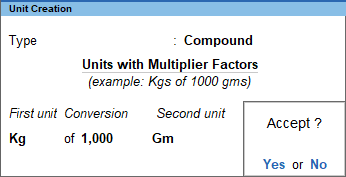
- Press Ctrl+A to create the Compound Unit.
With the given example, you would have created a Kg with the conversion factor of 1000 Gm.
You can use the Unit for any item as needed. In a similar way you can create other Compound Units.
Alter or Delete Masters
In case you need to update details in any master, you can use the Alter option. Similarly, if you do not need a specific master, then you can delete it.
Alter Masters
As in the case of creating masters, you have different options to alter masters too.
- Go to Gateway of Tally > Alter or use Alt+G (Go To) > Alter Master > select the type of master under which the required master exists > select the master you want to alter.
- Update the details as needed and save.
These details will be used hereafter.
Tip: Press Ctrl+A to save any data entry screen, without entering all values or navigating to the end of the screen.
Delete Masters
You can delete a master if there are no other masters or transactions using it. For example, you can delete a Group if no ledgers are using the Group. Similarly, you can delete a Stock Item, if no recorded transactions have used that Stock Item.
In case there are masters or transactions that use the master that you want to delete, first delete the dependent master or transaction, and then delete the master you intended to delete.
- Go to Gateway of Tally > Alter or use Alt+G (Go To) > Alter Master > select the type of master under which the required master exists > select the master you want to delete.
- Press Alt+D. A message appears asking confirmation to delete.
- Press Y.
The master will be deleted.
Tip: When you have a master creation screen open, you can use Page up to fetch the previous master, and Page down for the next (if you are on a master in between). The existing masters are shown in alteration mode. Page up on the first master, will take you to the last master created.
Record Transactions in Different Modes | Change Mode
You can record transactions in different modes using the default templates in TallyPrime. The Change Mode option in TallyPrime allows you to quickly switch between different modes.
Double Entry/Voucher Mode
- Open the voucher screen.
- Press Alt+G (Go To) > Create Voucher or Gateway of Tally > Vouchers, and press F5 (Payment).
You can select any type voucher using the right button options. - Ensure that the screen is in Voucher Mode.
Press Ctrl+H (Change Mode) > select Double Entry/Voucher Mode (if needed).
- Press Alt+G (Go To) > Create Voucher or Gateway of Tally > Vouchers, and press F5 (Payment).
- Specify the Particulars of the transaction.
- Select the ledger by which you are making the payment – By Cash or Bank and specify the amount.
- Select the ledger for which you are making the payment – To Rent and specify the amount.
If ledgers are not available, you can create it on the fly by pressing Alt+C. In Ledger Creation (Secondary) screen, give ledger name as per your needs and select the required group in the Under field.
- Provide Narration, if any.
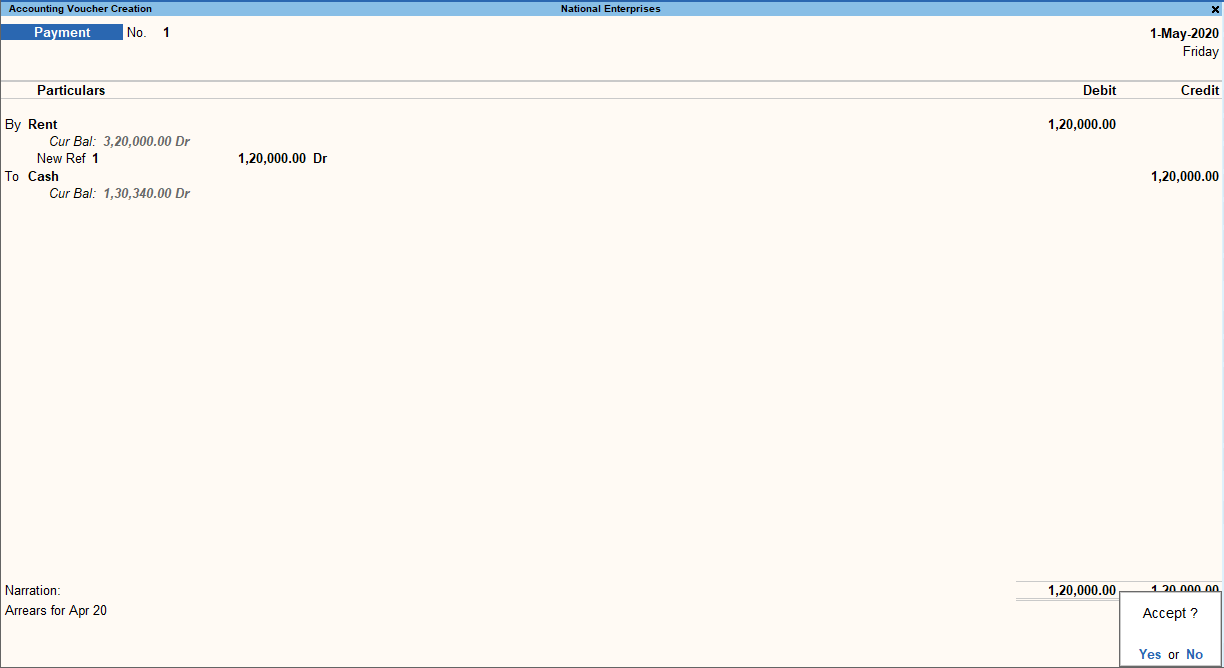
- As in the case of masters, you can use Ctrl+A, or press Y in the Accept message box to save.
In a similar way, you can create any other voucher in double entry mode.
Tip: In case you want to change the voucher date, press F2.
When you press F2 to change the date, the date shown is for the subsequent day of the current date. This is done to avoid manual entry of date for the next day as the immediately next day is the most common business day. You can, however, enter any date, even earlier dates (for back-dated entries).
Press Alt+F2 to change the period.
Press F2 in reports to change the period.
Accounting Invoice Mode
- Open the voucher screen.
- Press Alt+G (Go To) > Create Voucher or Gateway of Tally > Vouchers, and press F8 (Sales).
You can select any type of voucher using the right button options. - Ensure that the screen is in Accounting Invoice Mode.
Press Ctrl+H (Change Mode) > select Accounting Invoice Mode (if needed).
- Press Alt+G (Go To) > Create Voucher or Gateway of Tally > Vouchers, and press F8 (Sales).
- Select the mode of payment.
- In Party A/c name field, select Cash ledger or Bank ledger.
- Select the ledger and specify the Amount.
- Provide Narration, if any.

- As in the case of masters, you can use Ctrl+A, or press Y in the Accept message box to save.
In a similar way, you can create any other voucher. Accounting invoices are mostly used when services are rendered.
Tip: When you are on a transaction creation screen, you can use Page up to fetch the previous transaction of the same type, and Page down for the next. The existing vouchers are shown in alteration mode. Page up on the first voucher, will take you to the last voucher created.
Item Invoice Mode
- Open the voucher screen.
- Alt + G (Go To) > Create Voucher or Gateway of Tally > Vouchers, and press F8 (Sales).
You can select any type of voucher using the right button options. - Ensure that the screen is in Item Invoice Mode.
Press Ctrl+H (Change Mode) > select Item Invoice Mode (if needed).
- Alt + G (Go To) > Create Voucher or Gateway of Tally > Vouchers, and press F8 (Sales).
- Specify the buyer details.
- In Party A/c Name, select Cash or Bank for cash sales. For credit sales, select the party name.
- On the Dispatch Details & Order Details screen, specify the details if you want to print in the invoice.
Alternatively, press Ctrl+A to proceed without entering the details.
If you do not see this screen, then press F12 in the voucher screen and set Provide dispatch, order, and export details to Yes. You can use F12 configuration of the Dispatch Details & Order Details screen to set the order and export details on or off. - On the Party’s Details screen, specify the required details.
If you do not see this screen, then press F12 in the voucher screen and set Provide buyer details to Yes.
- Select the accounting ledger for item allocation.
- In Sales ledger, select the required ledger created under Sales Accounts group.
As in other transactions, you can create the ledger on the fly by pressing Alt+C.
In case you do not see the Sales ledger field on-screen, press F12 and set Select common ledger for item allocation to Yes.
- In Sales ledger, select the required ledger created under Sales Accounts group.
- Select item details.
As explained above, you can create the item on the fly by pressing Alt+C.- In case of stock item, enter the Quantity. Rate will be auto-filled, if available for the stock item. However, you may choose to enter the Rate or Value.
- Provide Narration, if any.
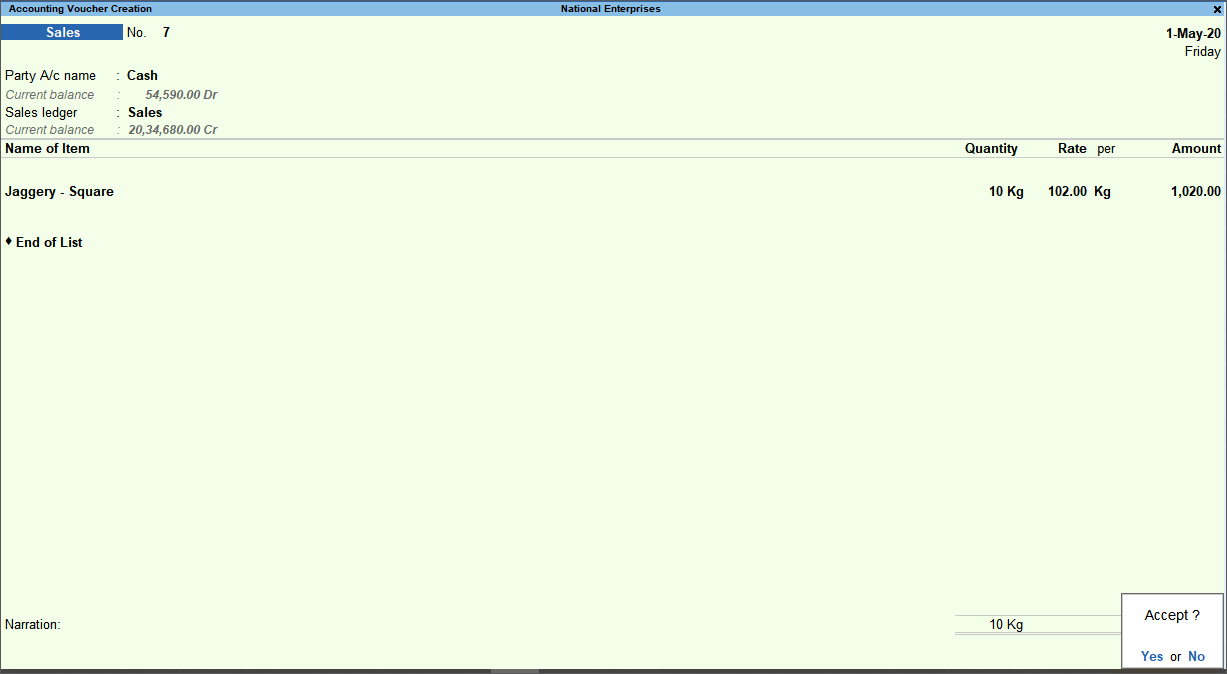
- As in the case of masters, you can use Ctrl+A, or press Y in the Accept message box to save.
Tip: The only prerequisite for you to start recording transactions is to create a Company in TallyPrime. You can create all the required ledgers and items on the fly.
Open Other Options | Go To (Alt+G)
Press Alt+G to open any master, transaction or report regardless of where you are now. This helps in handling any ad-hoc requirements that come up when you are working on something. For example, when you are recording a long purchase order, assume that a creditor comes in to make payment. You can leave the order entry wherever it is, check the outstanding and then record the receipt. After recording the receipt, you can come back to the outstanding report to verify, and then to the order screen, and continue from where you left. You can use this option to hold a bill while a customer walks away to pick more items, and continue to enter a bill for the next customer.
You can open many such screens, one on top of the other. Closing the last opened screen will take you back to the immediate previous screen, and then you can continue from where you left it.
Move to Other Options | Switch To (Ctrl+G)
Press Ctrl+G to leave the current master, transaction or report regardless of where you are now, and move to a different screen.
This helps in quickly moving to any other option without navigating to the Gateway of Tally. For example, assume that you started with viewing Balance Sheet and drilled down to Capital Account, then to Drawings of Owner, then Ledger Monthly Summary, and Ledgers Vouchers for April 2020. In case you need to view the Day Book or create a voucher, using the Gateway of Tally options, you need to press Esc four times to reach the Gateway of Tally. Then choose the option Day Book or Vouchers > Create. However, if you are using Ctrl+G, then you need not do this. Just press Ctrl+G, and select the option you want.
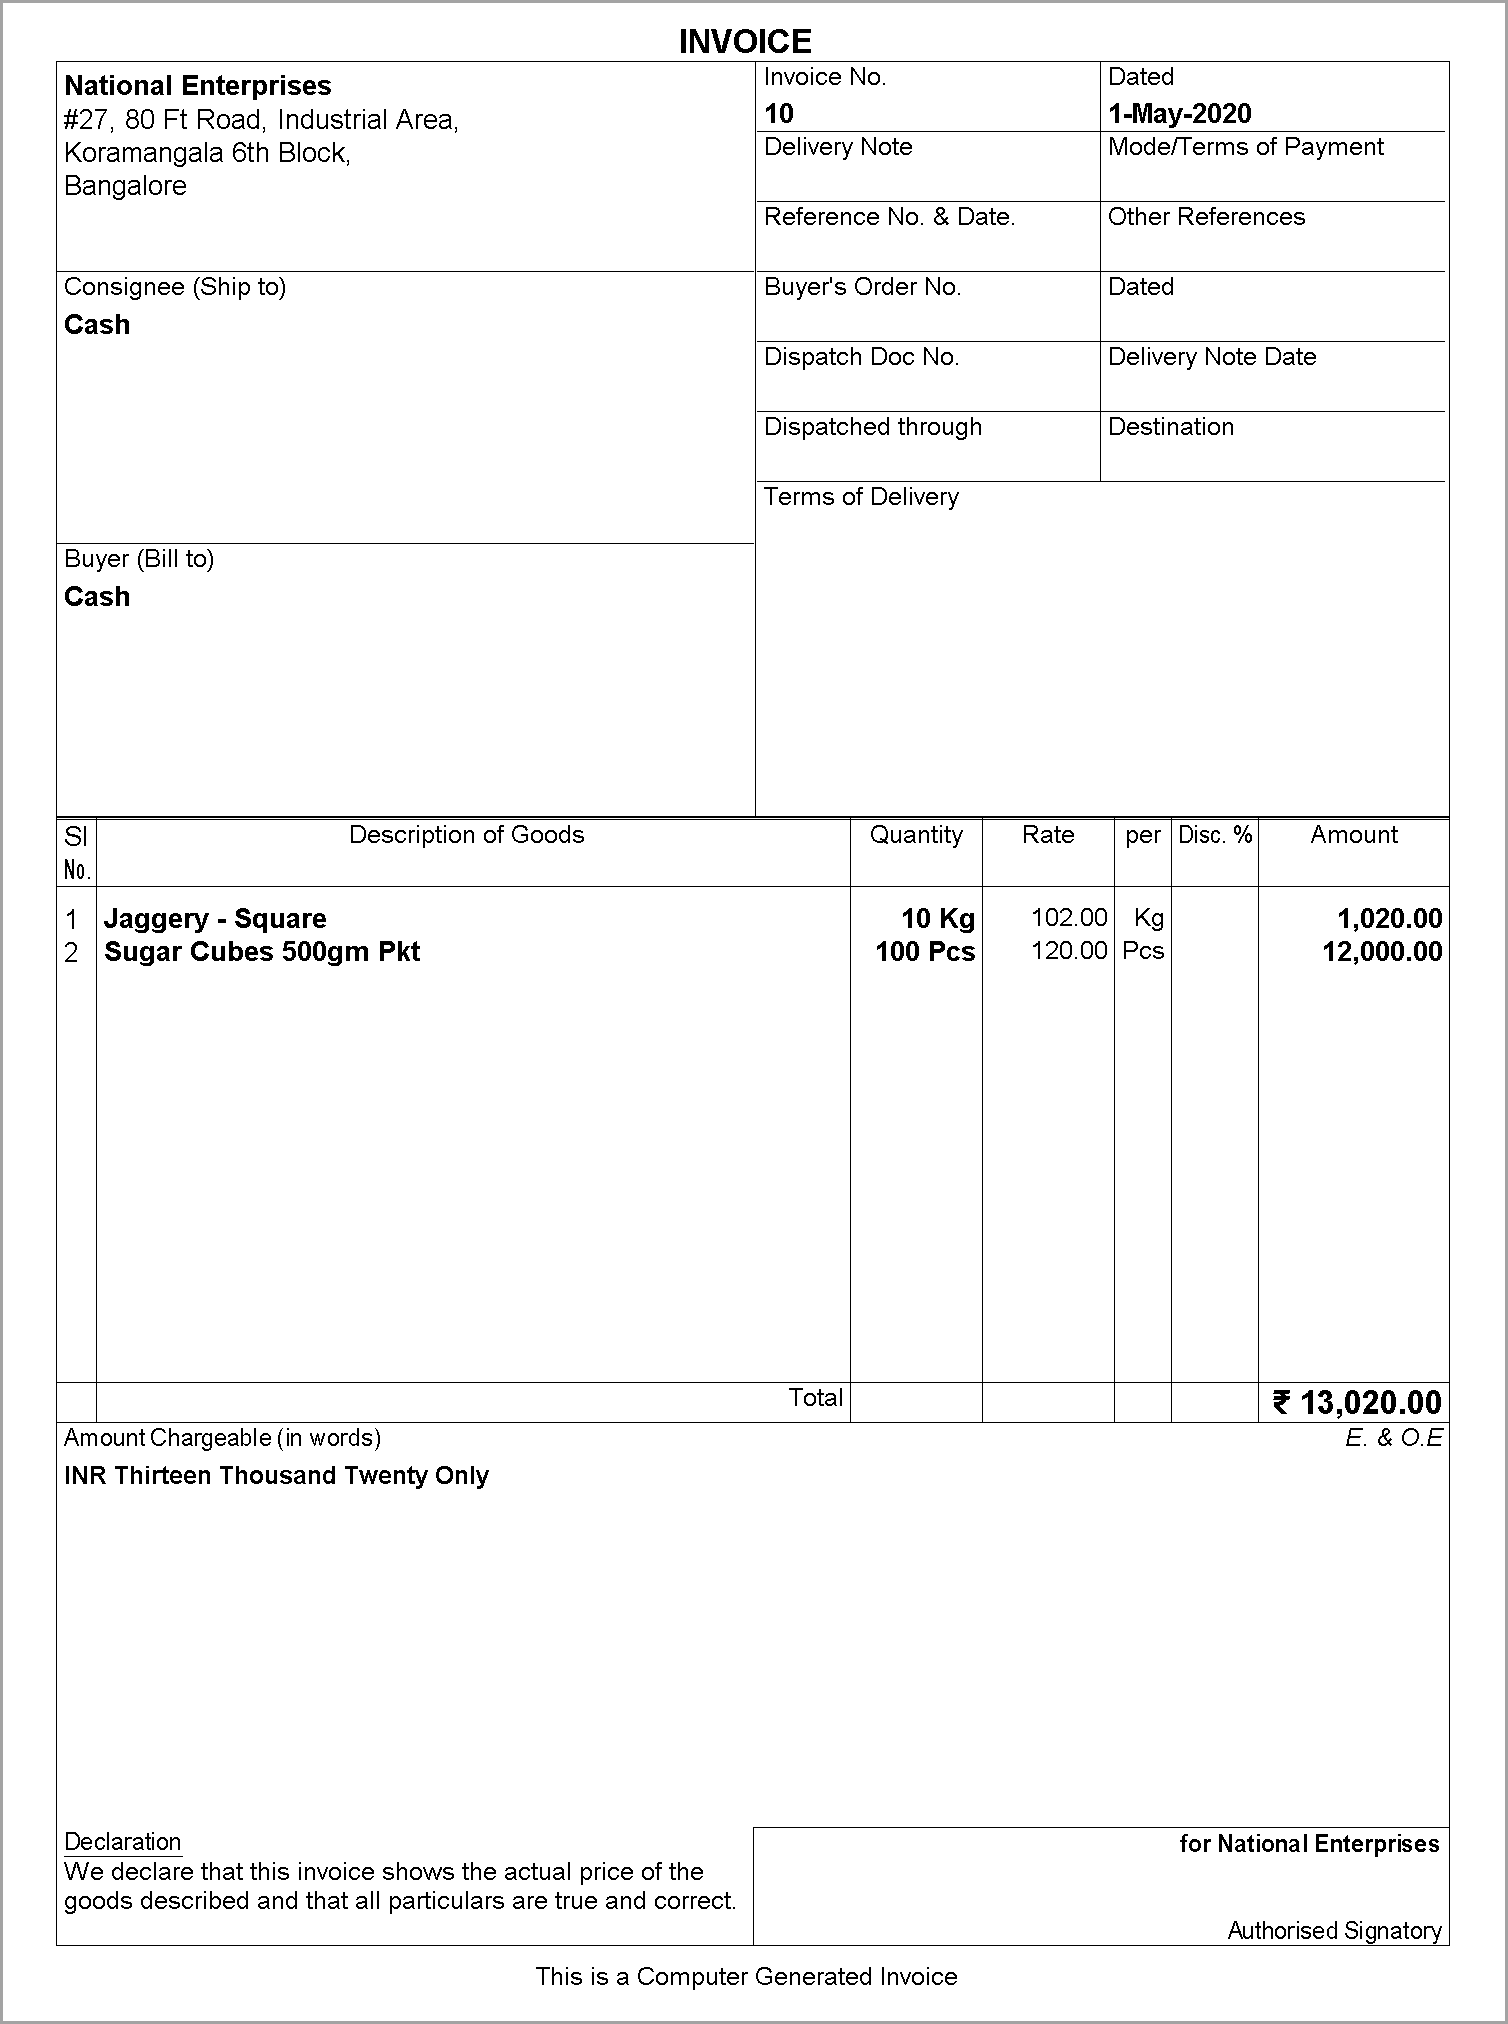
Print Invoices
You can print invoices after recording it. TallyPrime offers different formats to print invoices. You can configure the values that need to be printed in different types of invoices.
- Press Ctrl+P to print the current invoice.
- Press C to configure the details for printing.
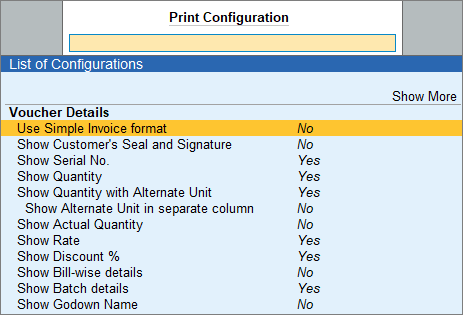
When you start typing a word, the list will get filtered to show the options that have the letters you entered. Select the required option and press Enter to change the configuration. While the Yes/No options will toggle when you press Enter, another sub-screen will display options for other types of configurations. - Press I to preview the invoice.
- Press P to print.
The invoice will be printed on the printer you have configured.
You can also configure TallyPrime to print the invoice on saving the voucher.
Alter or Delete Transactions
In case you need to update details in any voucher, you can use the Alter option. Similarly, if you do not need a specific voucher, then you can delete it.
Alter Transactions
As in the case of recording transactions, you have different options to alter transactions too.
- Go to Gateway of Tally > Vouchers or use Alt+G (Go To) > Voucher Reports > select the required report, and drill down to the voucher.
Alternatively, you can open any report that shows the required voucher, drill down to the voucher and alter it. - Update the details as needed and save.
These details will be used hereafter.
Delete Transactions
You can delete a transaction if you have recorded a transaction by mistake, or duplicated any.
- Go to Gateway of Tally > Vouchers or use Alt+G (Go To) > Voucher Reports > select the required report, and drill down to the voucher.
- Press Alt+D. A message appears asking confirmation to delete.
- Press Y.
The voucher will be deleted.
Tip: Select the required item in the transaction and press Ctrl+D to delete the item from a transaction.
Real-time Reports and Related TallyPrime Features
You can generate reports in TallyPrime anytime. You can also start viewing your Accounting, Inventory, and Financial reports as soon as you record your first transaction. Depending on the transaction that you record, the corresponding reports will be populated. For example, consider a situation that you have recorded a rent payment. You can view this transaction in Day Book, Payment Register, Balance Sheet, Profit & Loss A/c, Ratio Analysis, Trial Balance, Cash Flow, Funds Flow, Cash/Bank Book, and so on. This transaction will also show up in the GST returns as not relevant for returns. So, this offers you ultimate confidence on tracking all your transactions to a granular level.
On the other hand, consider a situation where you are viewing transactions in one of your reports. And you have doubts about a figure that is shown in the report. You can just press Enter on the line that has the amount that you are uncertain about, to drill down and find further details of the transaction. This will take you to the next level of the report that gives you further details.
In case you have not reached the voucher that accounts for the transaction yet, you can continue to drill down until you reach the source voucher. Depending on the report that you are viewing, reaching the voucher may happen in a single step, or will take you to different reports that contributed to the final value. Once you reach the voucher, you can update the details, if there is any mistake or missing piece. As in all other cases, when you are at a lower level in a report, press Esc to move up one level at a time.
TallyPrime Features for Viewing Reports
You can use multiple ways to view reports in TallyPrime. You can view all the reports in TallyPrime using the options in Gateway of Tally. Alternatively, you can find any report using Alt+G (Go To).
The most frequently used reports like Day Book, Balance Sheet, Profit & Loss A/c, Stock Summary, and Ratio Analysis are listed in Gateway of Tally. Use Display More Reports to see all other reports. When you select Display More Reports you can see a list of reports grouped under Accounting, Inventory, Statutory, and Exception. You can choose any of these and view the report or get to the next level of report listing. Notice that even in Gateway of Tally menu pressing Esc takes you to the immediate previous level.
To open Balance Sheet,
- Go to Gateway of Tally > Balance Sheet or use Alt+G (Go To) > Balance Sheet.
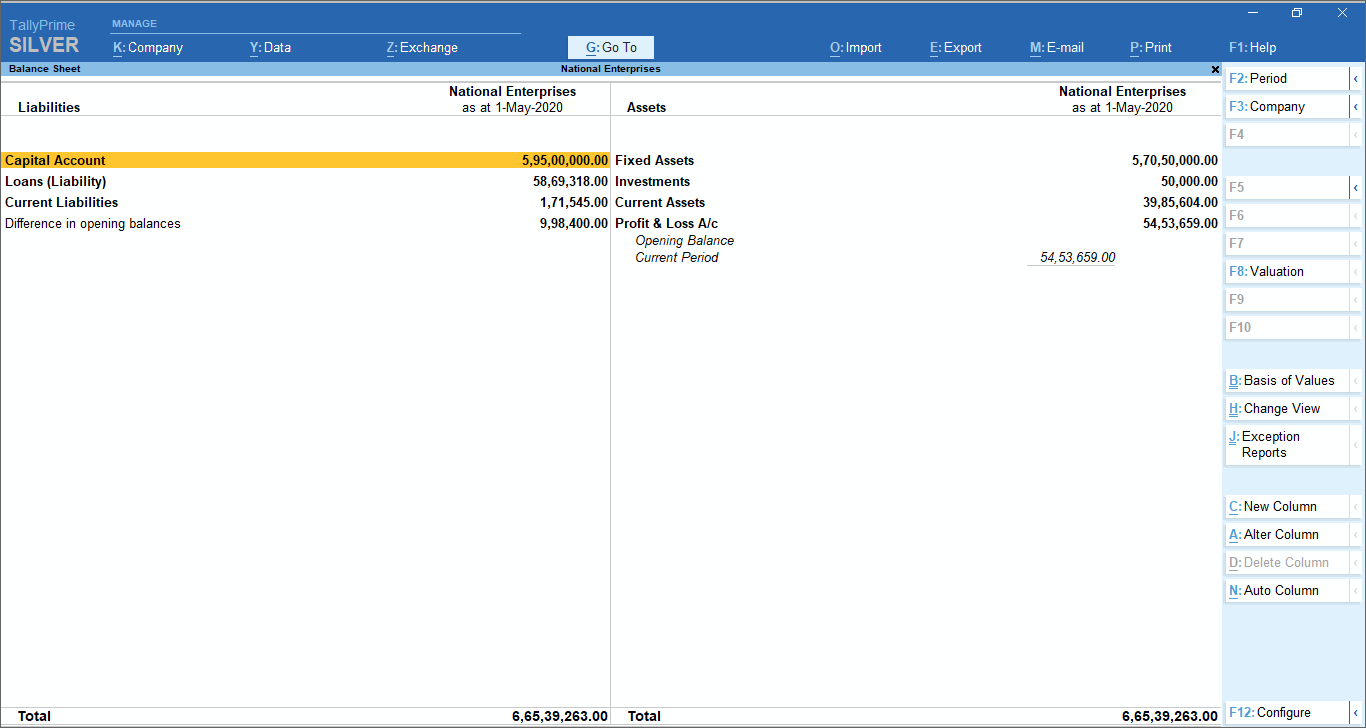
- Explore the Balance Sheet, by drilling down.
- Notice that the Capital Account is selected when the report is opened.
- Press Enter to view further details of Capital Account – Group Summary.
- Notice that the first Group in the report is selected. Use Down and Up arrow keys to move to other Groups.
- Press Enter to view the details of the Group – Ledger Monthly Summary.
- Select any month and press Enter.
- You can continue to drill down till the vouchers.
- Press Esc to move up one level at a time.
In a similar way, you can open any other report and explore.
Condensed/Detailed View
Apart from the facility to drill down to the voucher level, there are other TallyPrime features offered in the reports. You can press Alt+F5 for a detailed view/to explode all the lines in a report to show further details in the same report. Further details depend on the report that you have opened. For example, if you are in the Day Book, then the initial view shows the list of transactions based on the type of transaction. The detailed view shows the counterpart ledgers against which each transaction is recorded. In case you are viewing the Profit & Loss A/c, the detailed view shows the items that rolled up to the final value in the report.
If you want to see all details of a particular transaction, then select the line and press Shift+Enter. All the details of the transaction will be shown. Alternatively, you can use right-click to explode. You can roll up the details by pressing Shift+Enter or right-click again.
- Open Balance Sheet.
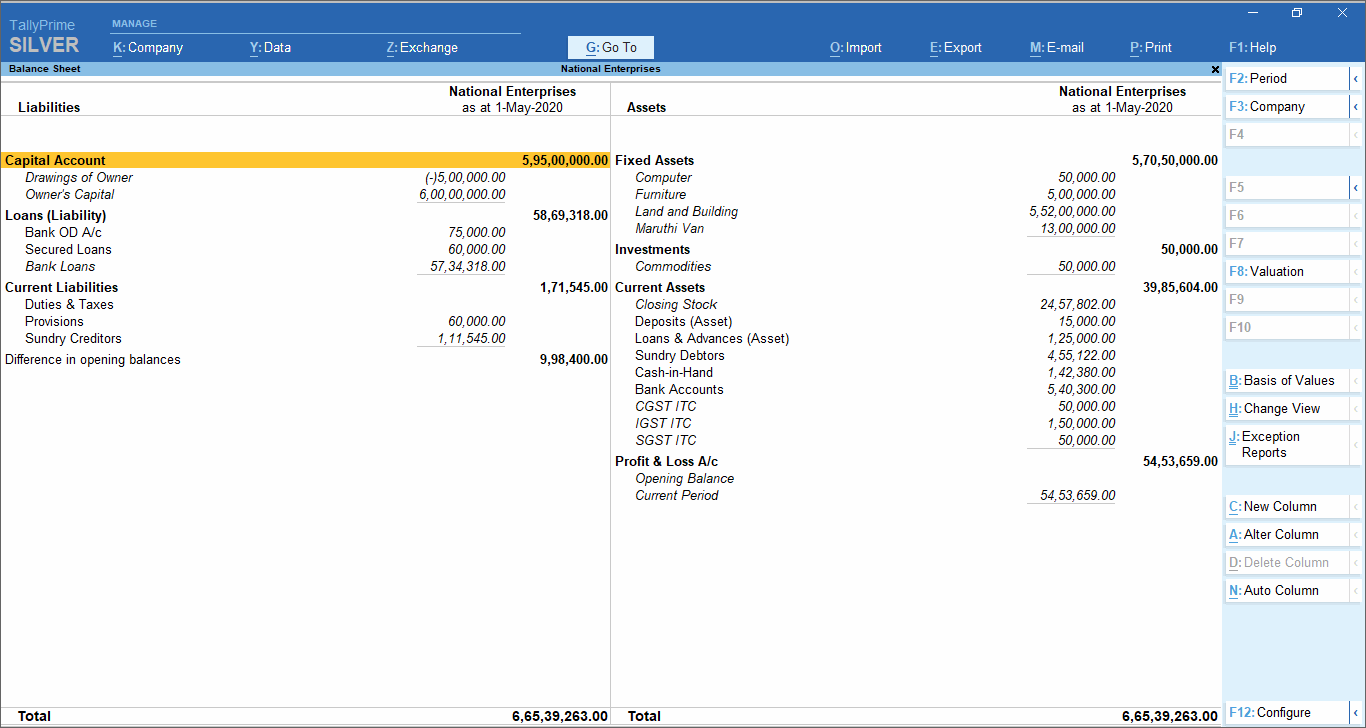
- View details of all lines.
- Press Alt+F5.
- Notice that every line in the report explodes to show further details.
- Use Down and Up arrow keys to move to other Groups in the same column.
- Use Right and Left arrow keys to move to the right and left columns.
- Press Alt+F5 again to collapse the details.
- View details of a specific line.
- Select a line in the report.
- Press Shift+Enter.
- Notice that the selected line in the report explodes to show further details.
- Use Down and Up arrow keys to move to other lines.
- Select the line you exploded, and press Shift+Enter to collapse the line.
In a similar way, you can open any other report and view details.
Filter data
You can view all the records in a report or decide to focus on selected records. In order to do this, you can apply a condition to filter records. For example, you can view only Payment vouchers in Day Book.
- Open Day Book.
- Press F4.
- Select Payment.
All the Payment vouchers recorded on the day will be shown.
Find data in reports
You can find transactions that have some specified values. For example, you want to find the transactions that has items from the Batch DR-75-19-20.
- Open Day Book.
- Press Alt+F12.
- Select Voucher in the Type of Information.
- Select Batch Name in the Particulars.
- Now select equal to in the Range of Information.
- Type DR-75-19-20 in the field.
- Select End of List in Condition.
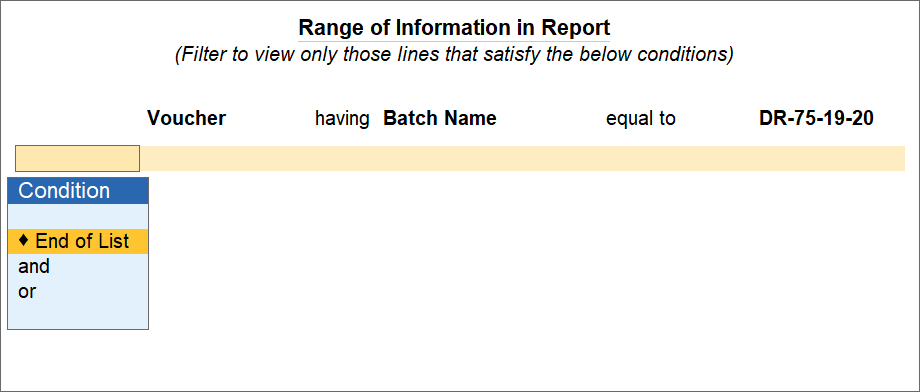
The Day Book gets filtered to show all vouchers that have items from the Batch DR-75-19-20.
Tip: In TallyPrime, options to interact with the reports remain the same.
Enter – To drill down to the next level of details for the selected line. In all reports, you can drill down to any of the source vouchers.
Alt+F5 – To explode all lines in the report at one shot, on the same screen.
Shift+Enter – To explode a selected line of the report on the same screen.
Esc – To move up by one level.
Print, E-mail, Fax, and Export Reports
Once a report is open, you can print, e-mail, fax, or export the report. You can do these for multiple reports at a time, without opening reports. You can export the reports in different formats – ASCII (Comma Delimited), Excel (Spreadsheet), HTML (Web-Publishing), JPEG (Image), PDF (Read-only document), or XML (Data Interchange). Export can be done for the currently open report, or different reports at a time. You can also choose to export a group of reports at a time – All Ledger Accounts, One Ledger Account, Group of Accounts, Sales Vouchers, Day Book, Multi-Voucher, Bills Receivables, or Bills Payable.
Print Current Report
- Open any report.
- Press Ctrl+P.
- Press C to configure the details for printing.
- Now press I to preview the invoice.
- Press P to print.
The report will be printed on the printer you have configured.
Print Other Reports
- Press Alt+P > Others.
- Select the report you want to print.
- Press C to configure the details for printing.
- Press I to preview the invoice.
- Finally, press P to print.
The selected report will be printed on the printer you have configured.
Tip: By now you have used many shortcuts to complete your tasks. These shortcuts help enhance your productivity, as you need not look at the screen and select the options.
Refer to Keyboard Shortcuts for the complete list.
TallyPrime Features for Report Views
When you open a report, you will see a summarised view of the transactions. As mentioned above, you can view further details using Detailed View or Shift+Enter, depending on the type of details you want to view. Apart from this, you can change the representation of data in the report depending on the needs you have. You can generate any report for a specific period of your choice, either in the current financial year or any previous year based on your needs. You can filter the data in the reports based on various criteria, find transactions that involves specific details like a party or item, hide certain transactions to see the impact on the report, change the